Mac Development Requirements (can develop for Mac, iOS, and Android):
Linux Development Requirements (can develop for Linux x64 and Android):
Windows Development Requirments (can develop for Windows and Android):
Raspberry Pi 2 or 3 Development Requirments:
Android Development Requirments:
Binaries built support the following configurations
Swift is a new and rapidly changing language. Support for Swift is experimental. It is currently available for macOS, iOS, Linux, Raspberry Pi, and Android. Availabilty is subject to change.
The workflow for Swift is analogous to all the other languages. Use the appropriate genprojswift
For macOS and iOS, Swift is built into Xcode so you don't need to do anything special to get it.
For Linux, Raspberry Pi, you must download Swift for your platform. (Check the Blurrr download page for links.) For commandline use, add the Swift root directory to your path (this is the directory that contains bin, lib, etc).
export PATH=$HOME/swift/usr:$PATHor pass the path using the command line switch --swiftroot /path/to/swift/root
genproj_swift_linux.sh --swiftroot $HOME/swift/usr ../..For GUI use, go to preferences and add the path to the Swift root directory there.
For Android, you must download the Swift/Android compiler for your host machine. As of this writing, only Ubuntu 15.10 is known to work, though this is expected to open up as time goes on. (Check the Blurrr download page for links.) For commandline use, set the environmental variable ANDROIDSWIFTROOT to the Swift/Android root directory (this is the directory that contains bin, lib, etc).
export ANDROID_SWIFT_ROOT=$HOME/SwiftAndroid/usror pass the path using the command line switch --swiftroot /path/to/swift/root
genproj_swift_android.pl --swiftroot $HOME/SwiftAndroid/usr ../..For GUI use, go to preferences and add the path to the Swift root directory under the Android settings.
Valve provides a stable ABI for Linux called Steam-Runtime so it is actually possible to ship binaries that will reliably work. When you build against the Steam-Runtime ABI, your apps will work on SteamOS and within Steam Client for Linux. The original ABI was based on Ubuntu 12.04 LTS. This means that if you build against Ubuntu 12.04 LTS, your binaries should work with Steam-Runtime.
Additionally, with a lot of care, it is sometimes possible to build on older Linux distros (with older GLIBC) and run on newer ones, provided your dependent libraries haven't broken compatibility. Blurrr has spent some time trying to take advantage of this fact, and its binaries have been shown to work on many different if you build on 12.04 LTS or Steam-Runtime. However, this is not guaranteed.
However, Steam-Runtime has deviated a little from Ubuntu 12.04 LTS because it provides newer versions of compilers, which means newer GLIBC among other things. This means Steam-Runtime built apps are no longer capable of running on Ubuntu 12.04.
As of this writing, the C and Lua versions of Blurrr SDK will allow you to develop in Ubuntu 12.04 LTS or Steam-Runtime. JavaScript and Swift require Steam-Runtime.
So what does this all mean? Developing in Steam-Runtime will always work. However, it can be more convenient to not work in Steam-Runtime for casual development (and only worry about Steam-Runtime for deployment). If you choose to work outside of Steam-Runtime in your normal Linux environment, then you need a Linux with a GLIBC greater or equal to what the SDK needs. Currently, for C & Lua, you need Ubuntu 12.04 LTS or greater. For everything else, something greater than or equal to what is provided in Steam-Runtime is needed.
While we have a great deal to simplify building for Android, setting up an Android development environment is more difficult than all the other platforms and may require patience if you've never done this before. (Please direct your negative feedback to Google, not us.)
For those familar with Android development, it's very straight forward.
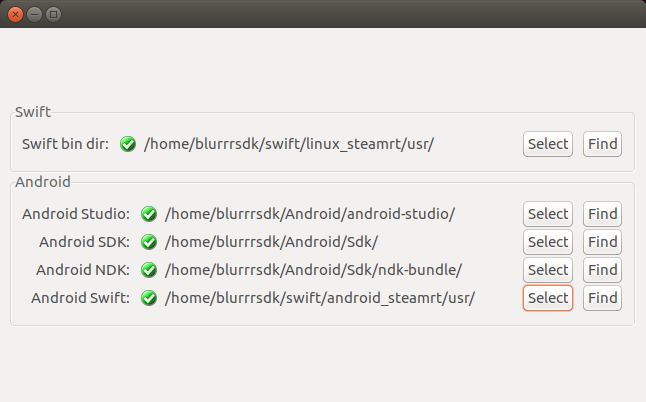
For BlurrrGenProj GUI users, launch BlurrrGenProj and select "Preferences" in the menu. Specify the location for each component in the GUI.

Optionally, set the following environmental variables to the correct paths. If you do not set these environmental variables, you will be required to pass the paths explicitly as arguments to the command line tools.
# Swift/Android users should set
ANDROID_SWIFT_ROOT
For more detail, go to the section entitled Android Install: In-Depth.
Blurrr itself does not need to be formally "installed". It can be placed and run from anywhere on your file system.
For purposes of this document, it will be assumed you placed it in
~/BlurrrSDK on Unix machines

C:\BlurrrSDK on Windows
If you are using the command line, for easier use, it is recommended you place this in your PATH, but this is optional.
We will build a Lua based project as an example. The process is exactly the same for C, JavaScript, and Swift based projects. Simply substitute the appropriate version of the template and the correct langage name for the genproj_* script if using the command line, or select the appropriate pop up boxes in the GUI.
Note: For alternative documentation, the Introduction to Blurrr SDK on YouTube covers the GUI approach to this topic.
Additional Note: The documentation below creates a brand new project for each platform, as if you were reading each section for the very first time. In reality, you just create a project once and share that code to generate a build system for each platform. Simply skip the creating a new project each time and refer to your existing project code when generating a build system.
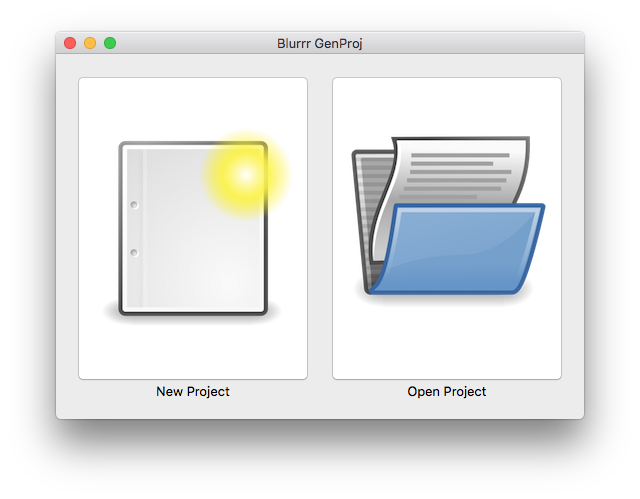
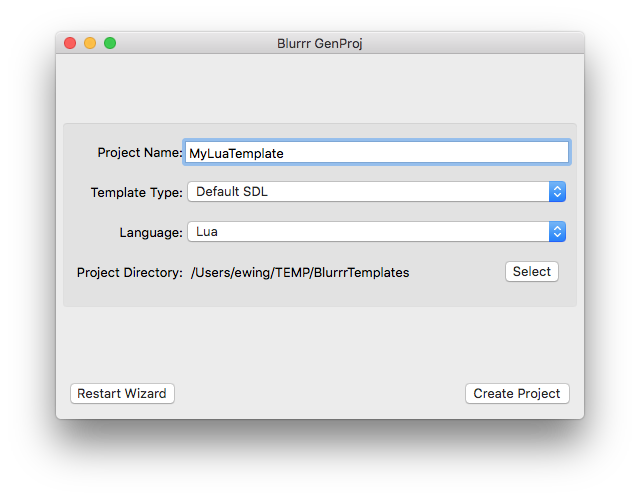
Select macOS as the Platform and click Generate. 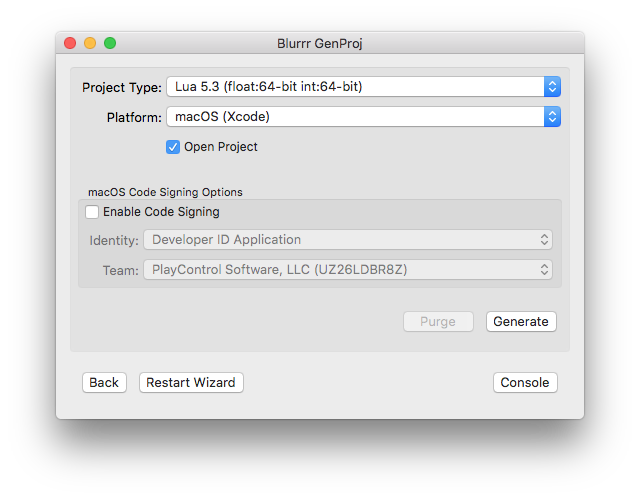
Xcode should automatically open in a few momments.
In Xcode in the top toolbar, make sure to set the active target to the MyBlurrrProject application. (Xcode likes to default to the ALL_BUILD target which is not as useful.)
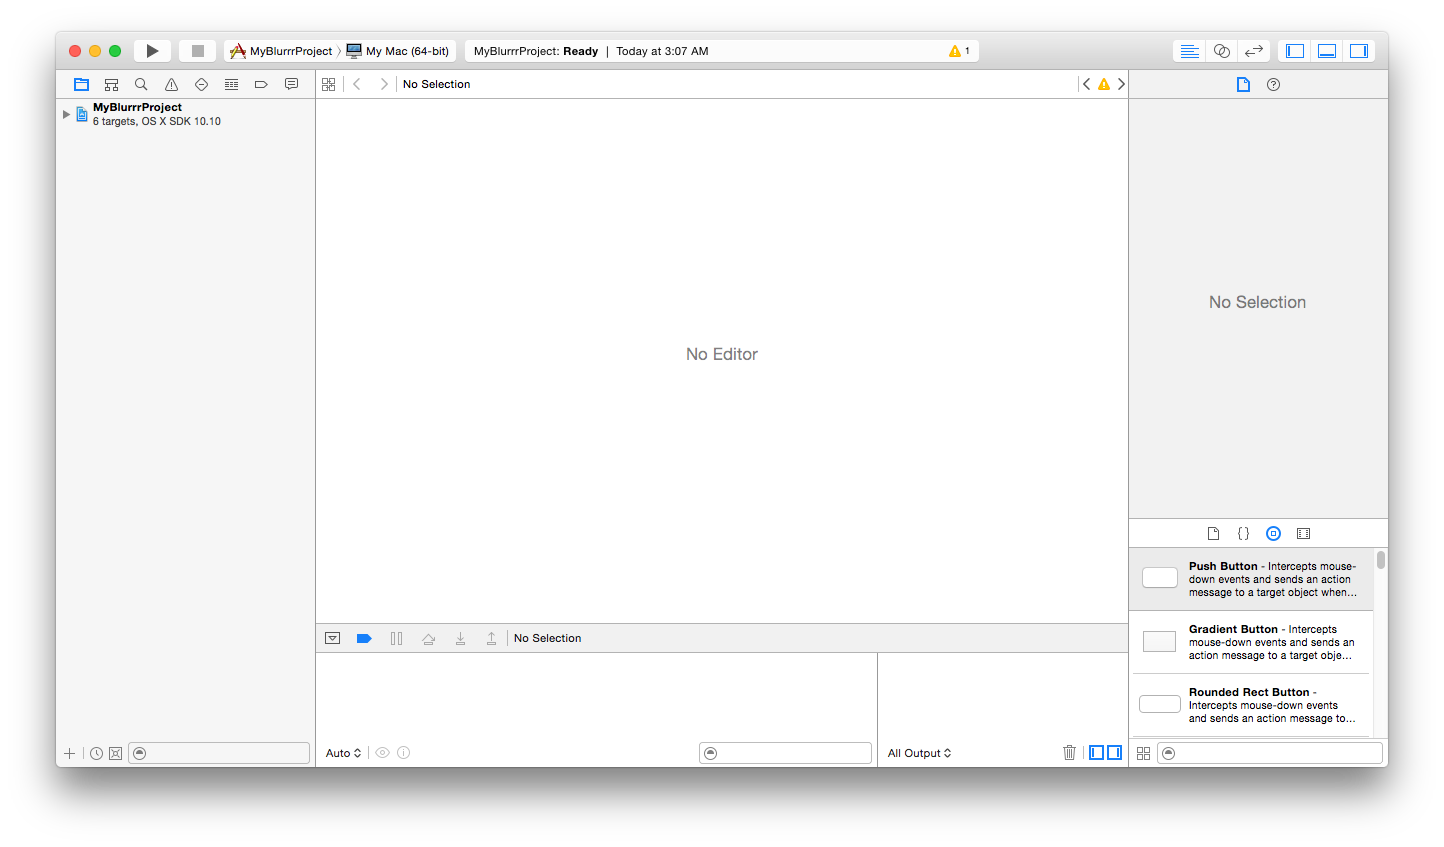
Hit the run button. The application should build and run.
(Optional) Add the location of the Blurrr SDK to your environment path.
This will allow you to invoke the Blurrr SDK tools without typing in the absolute path all the time.
export PATH=$PATH:~/BlurrrSDKAlso, consider adding this to your .bashrc or appropriate shell configuration file.
Go into the BlurrrSDK Templates folder and copy one of the templates directories (C, Lua, or JavaScriptCore) to some where on your computer. You may use Finder or use the command line, e.g.
cp -R ~/BlurrrSDK/Templates/Lua ~/Desktop/MyLuaTemplateNow you have a new project containing all the source code and resources. But you don't have a build system yet.
Make a new empty directory some where else which will hold your build system.
As an example, make a directory called BUILD inside your copy of the template. (Optional) Then make a subdirectory called macOS. (This will allow us to keep all the different platforms separated, but under the same common BUILD directory.) You may use Finder or the command line, e.g.
mkdir -p ~/Desktop/MyLuaTemplate/BUILD/macOSOpen up Terminal.app (if you haven't already) and change directory to the BUILD/macOS directory.
cd ~/Desktop/MyLuaTemplate/BUILD/macOSThere are multiple .sh scripts in the home directory of the Blurrr SDK. You want to run the one that suits the template you picked. The scripts are named with the scheme
genproj_<language>_<platform>.shThe script takes one parameter, which is the path to your template project.
Execute the following to generate a build system.
# Assumes you put Blurrr SDK in your PATH
genproj_lua_f64i64_osx.sh ..
Note: If you didn't put the Blurrr SDK in your path, you must specify the path to genproj.
# If you didn't put Blurrr SDK in your path,
# you must provide the full path
~/BlurrrSDK/genproj_lua_f64i64_osx.sh ..
This will generate an Xcode project to build macOS binaries for a Lua based project.
Xcode should automatically open in a few momments.
In Xcode in the top toolbar, make sure to set the active target to the MyBlurrrProject application. (Xcode likes to default to the ALL_BUILD target which is not as useful.)

Hit the run button. The application should build and run.


Select iOS as the Platform and click Generate. 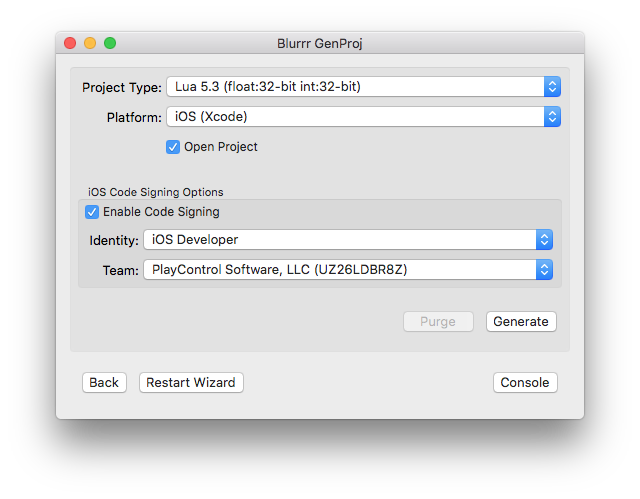
Xcode should automatically open in a few momments.
In Xcode in the top toolbar, make sure to set the active target to the MyBlurrrProject application. (Xcode likes to default to the ALL_BUILD target which is not as useful.)
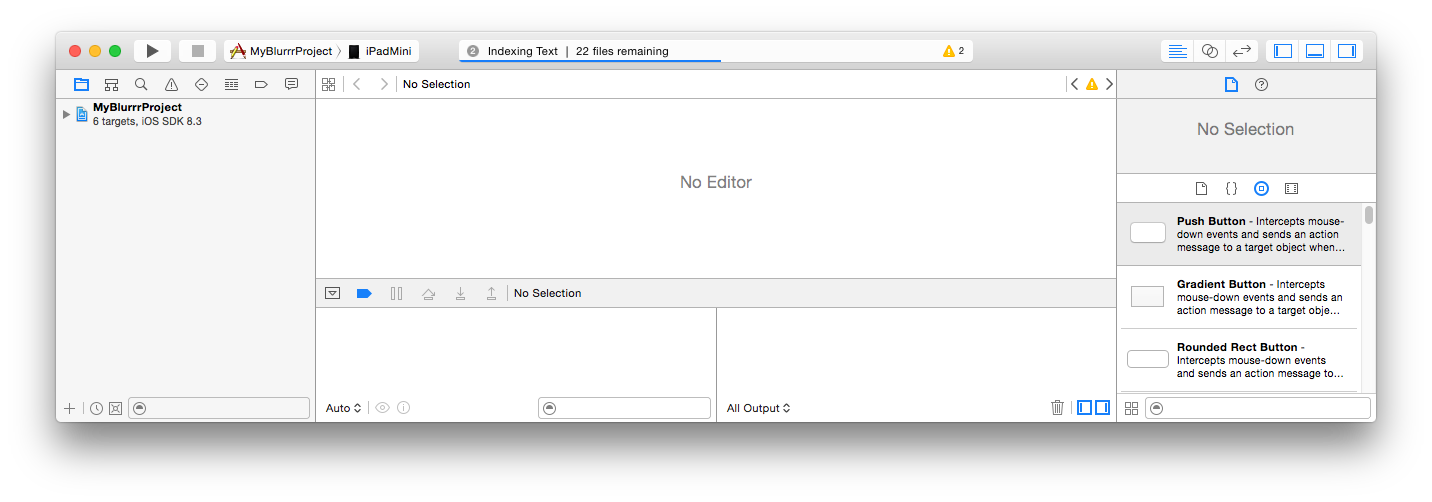
Hit the run button. The application should build and run.
(Optional) Add the location of the Blurrr SDK to your environment path.
This will allow you to invoke the Blurrr SDK tools without typing in the absolute path all the time.
export PATH=$PATH:~/BlurrrSDKAlso, consider adding this to your .bashrc or appropriate shell configuration file.
Go into the BlurrrSDK Templates folder and copy one of the templates directories (C, Lua, or JavaScriptCore) to some where on your computer. You may use Finder or use the command line, e.g.
cp -R ~/BlurrrSDK/Templates/Lua ~/Desktop/MyLuaTemplateNow you have a new project containing all the source code and resources. But you don't have a build system yet.
Make a new empty directory some where else which will hold your build system.
As an example, make a directory called BUILD inside your copy of the template. (Optional) Then make a subdirectory called iOS. (This will allow us to keep all the different platforms separated, but under the same common BUILD directory.) You may use Finder or the command line, e.g.
mkdir -p ~/Desktop/MyLuaTemplate/BUILD/iOSOpen up Terminal.app (if you haven't already) and change directory to the BUILD/iOS directory.
cd ~/Desktop/MyLuaTemplate/BUILD/iOSThere are multiple .sh scripts in the home directory of the Blurrr SDK. You want to run the one that suits the template you picked. The scripts are named with the scheme
genproj_<language>_<platform>.shThe script takes one parameter, which is the path to your template project.
Execute the following to generate a build system.
# Assumes you put Blurrr SDK in your PATH
genproj_lua_f32i32_ios.sh ..
Note: If you didn't put the Blurrr SDK in your path, you must specify the path to genproj.
# If you didn't put Blurrr SDK in your path,
# you must provide the full path
~/BlurrrSDK/genproj_lua_f32i32_ios.sh ..
This will generate an Xcode project to build iOS binaries for a Lua based project.
Xcode should automatically open in a few momments.
In Xcode in the top toolbar, make sure to set the active target to the MyBlurrrProject application. (Xcode likes to default to the ALL_BUILD target which is not as useful.)
Attach your development iOS device via USB to your Mac.
There is setting in the toolbar that will let you choose whether you want to build for device or iOS simulator. Select the device. (The simulator will work too.)

Hit the run button. The application should build and run.
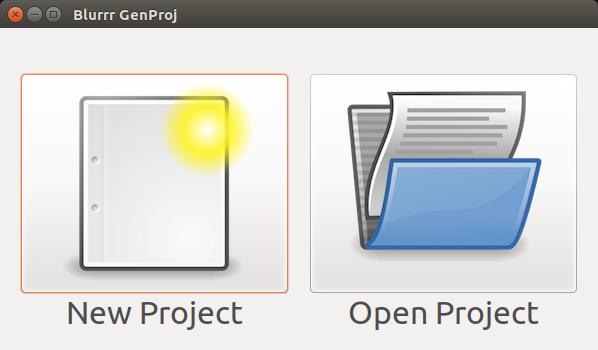
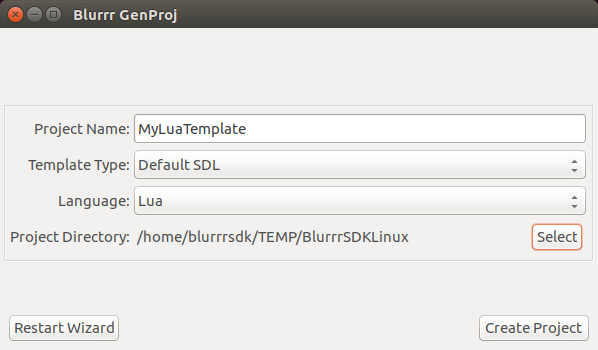
Select Linux as the Platform and click Generate. 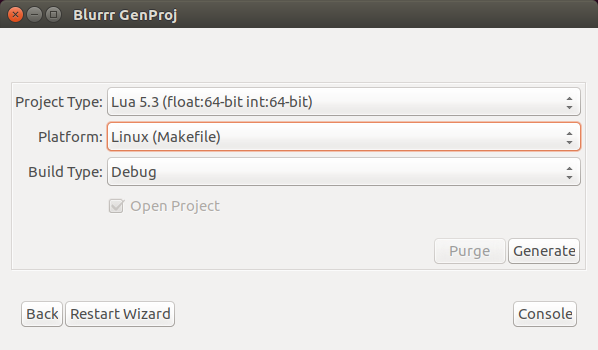
A busy progress indicator should spin for a moment and then disappear. Makefiles are created during this process.
Open up a Terminal and change to the directory where the Makefiles were created. BlurrrGenProj creates the build system files inside your project directory under BUILD/Linux.
(NOTE: BUILD/Raspbian is used on Raspberry Pi.)
```` bash
cd ~/MyLuaTemplate/BUILD/Linux
````
To build, run make:
makeTo run, find the executable and run it:
./MyBlurrrProject(Optional) Add the location of the Blurrr SDK to your environment path.
This will allow you to invoke the Blurrr SDK tools without typing in the absolute path all the time.
export PATH=$PATH:~/BlurrrSDKAlso, consider adding this to your .bashrc or appropriate shell configuration file.
Go into the BlurrrSDK Templates folder and copy one of the templates directories (C, Lua, or JavaScriptCore) to some where on your computer. You may use Finder or use the command line, e.g.
cp -R ~/BlurrrSDK/Templates/Lua ~/MyLuaTemplateNow you have a new project containing all the source code and resources. But you don't have a build system yet.
Make a new empty directory some where else which will hold your build system.
As an example, make a directory called BUILD inside your copy of the template. (Optional) Then make a subdirectory called Linux. (This will allow us to keep all the different platforms separated, but under the same common BUILD directory.) You may use a graphical file manager or the command line, e.g.
mkdir -p ~/MyLuaTemplate/BUILD/LinuxOpen up a command line terminal (if you haven't already) and change directory to the BUILD/Linux directory.
cd ~/MyLuaTemplate/BUILD/LinuxThere are multiple .sh scripts in the home directory of the Blurrr SDK. You want to run the one that suits the template you picked. The scripts are named with the scheme
genproj_<language>_<platform>.shThe script takes one parameter, which is the path to your template project.
Execute the following to generate a build system.
# Assumes you put Blurrr SDK in your PATH
genproj_lua_f64i64_linux.sh ..
Note: If you didn't put the Blurrr SDK in your path, you must specify the path to genproj.
# If you didn't put Blurrr SDK in your path,
# you must provide the full path
~/BlurrrSDK/genproj_lua_f64i64_linux.sh ..
This will generate an Unix Makefile project to build Linux binaries for a Lua based project.
To build, run make:
makeTo run, find the executable and run it:
./MyBlurrrProjectLinux does not have a defacto IDE, so Makefiles are the common denominator. And unlike IDEs, Makefiles don't have a built-in toggle for Debug and Release builds. However, Blurrr's build system is built on CMake, which has mechanisms that will let you specify Debug and Release optimizations. The genproj_* scripts are wrappers around CMake and will pass additional arguments directly to CMake.
# Specifies Debug level optimization flags
~/BlurrrSDK/genproj_c_linux.sh -DCMAKE_BUILD_TYPE=Debug ..
# Now will switch to Release level optimization flags
~/BlurrrSDK/genproj_c_linux.sh -DCMAKE_BUILD_TYPE=Release ..
Valid CMAKE_BUILD_TYPE values are:
Debug
Release
MinSizeRel
RelWithDebInfo
If you find the need to switch between different build types frequently and do not like the time needed to fully recompile, consider generating multiple projects, each with a different configuration. Then merely switch to the appropriate directory when you need a specific configuration.
mkdir -p BUILD/Linux_Debug
mkdir -p BUILD/Linux_Release
cd BUILD/Linux_Debug
# This directory will contain a Debug build
~/BlurrrSDK/genproj_c_linux.sh -DCMAKE_BUILD_TYPE=Debug ..
# Switch to another directory to contain a Release build
cd ../Linux_Release
~/BlurrrSDK/genproj_c_linux.sh -DCMAKE_BUILD_TYPE=Release ..Blurrr SDK supports other generators in addition to Makefiles. These may be selected through the Platform dropbox in the BlurrrGenProj GUI, or using the command line switch -G "<which generator>". (See CMake documentation for names of generators.)
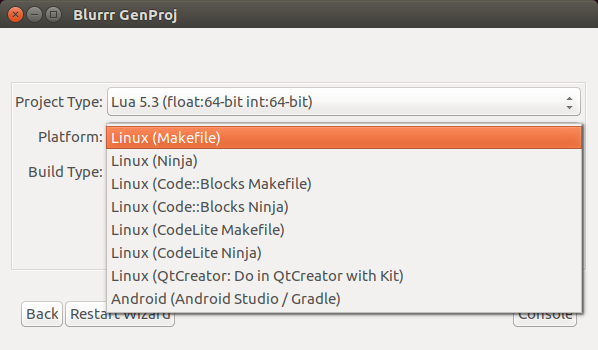
Ninja is build tool focused on speed. Many IDEs like to use Ninja under the hood to build projects for them.
Once ninja is installed and in your path, use the Ninja generator to generate projects like in the Makefile instructions above. Then simply type ninja instead of make.
For your convenience, the ninja executable is included with the BLurrr SDK in your <BlurrrSDKRoot>/Tools/bin/.
Code::Blocks is an open source IDE focused on C, C++, and Fortran.

CodeLite is an open source IDE focused on C, C++, PHP, and Node.js.

CodeLite projects use the extension .workspace. Because this extension name is fairly generic, make sure to associate the file extension with CodeLite in your distro's file manager. Blurrr SDK relies on xdg-open to open projects, which ultimately relies on this association being configured.
Qt Creator is an open source and commercial IDE focused on C++. It is possible to use Qt Creator with Blurrr. The setup workflow is a little different than all other IDEs. Since Qt Creator doesn't have a project format and instead has built-in direct support for CMake, you will direct Qt Creator to directly reference the CMakeLists.txt in your Blurrr project.
The caveat is that Qt Creator's environment does not know how to find any of the libraries that ship with Blurrr. Fortunately, Qt Creator has a mechansim to deal with this, called a "Kit".
When you create a "Kit", you will configure Qt Creator to use the genproj_*_linux.sh scripts instead of invoking the default CMake tool. The Blurrr genproj_* scripts are wrappers around the CMake tool which properly setup the environment so all the libraries in Blurrr SDK can be found. Creating a "Kit" is a one-time setup, so you will be able to reuse your Kit for all your Blurrr projects.
To create a Kit:
Projects tab. 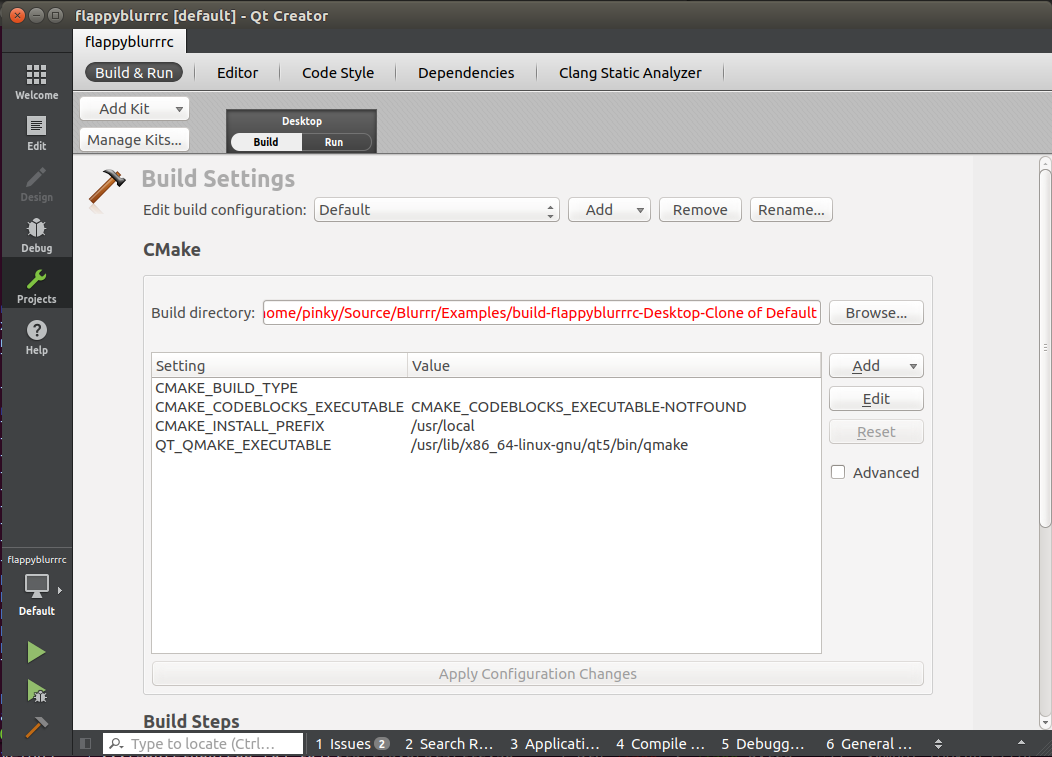
If you've already created the Kits before, you may skip the following steps and simple use Add Kit to pick the kit you created before and remove the default kit.
Otherwise, to create a new Kit:
Manage Kits... in the top left corner.Add to create a new kit. In this example, we will name it BlurrrC, denoting that we are adding a kit for the C SDK of Blurrr. Note: There is a different script for each language, so you may want to repeat this process later to create a kit for each language. You may also just do the one language you are interested in.
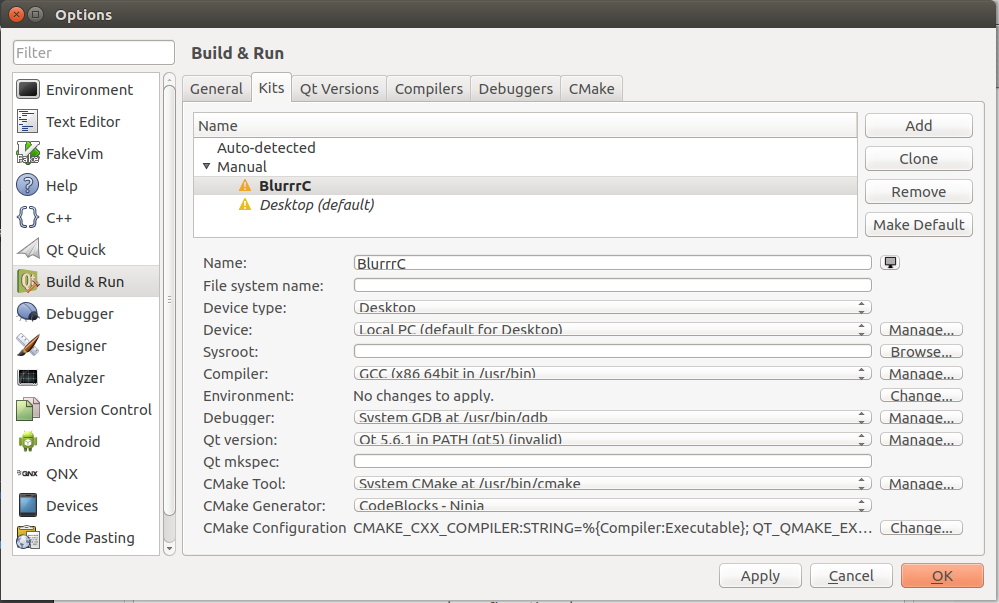
CMake Tool, click the Manage button so we can change the default CMake tool.Add to create a new CMake tool. genproj_c_linux.sh. 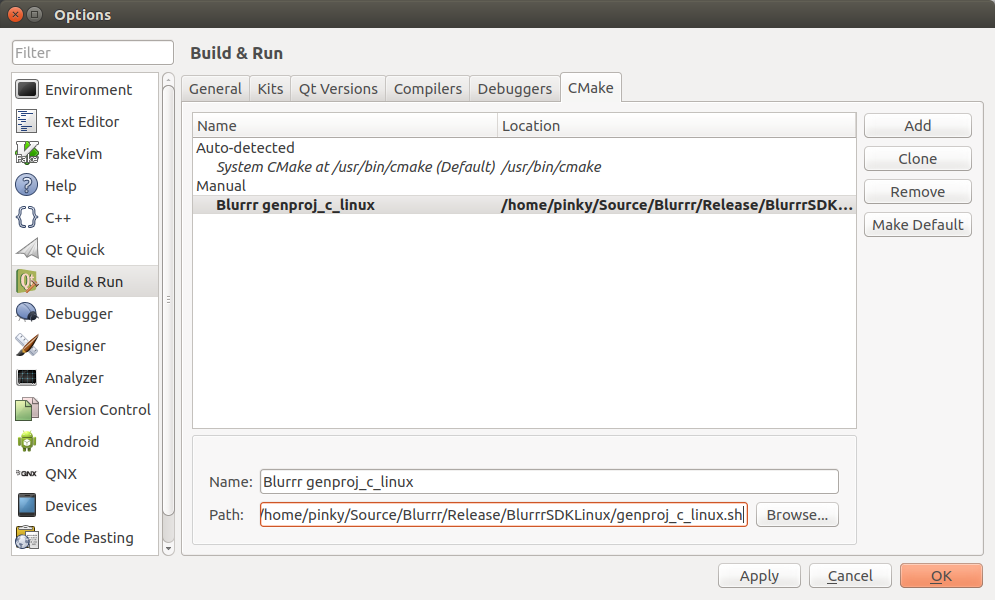
Apply and then OK.Manage Kits, the remaining defaults are okay. So press Apply and then OK to finish. 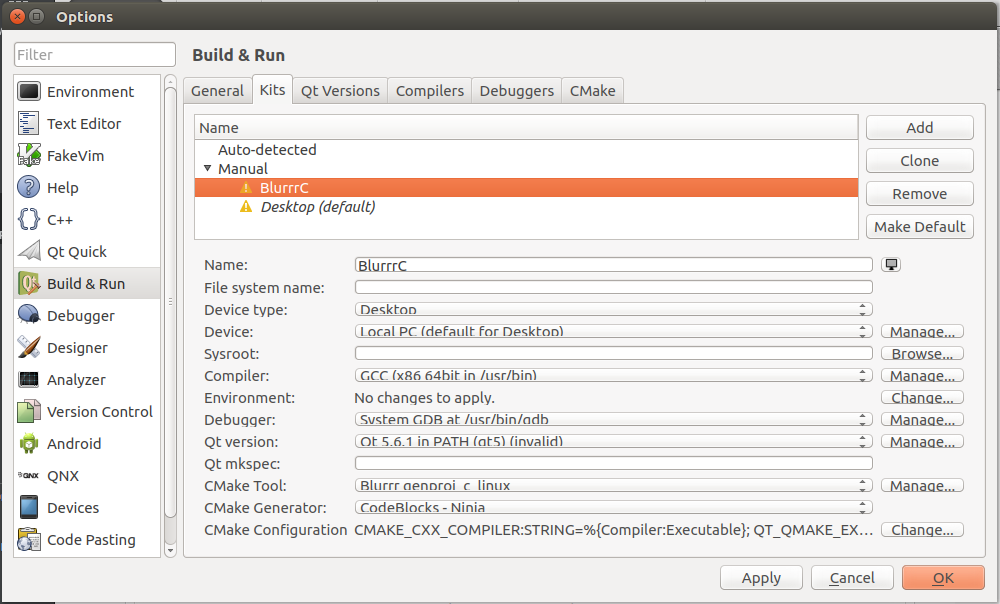
Desktop (default) one, so remove it. 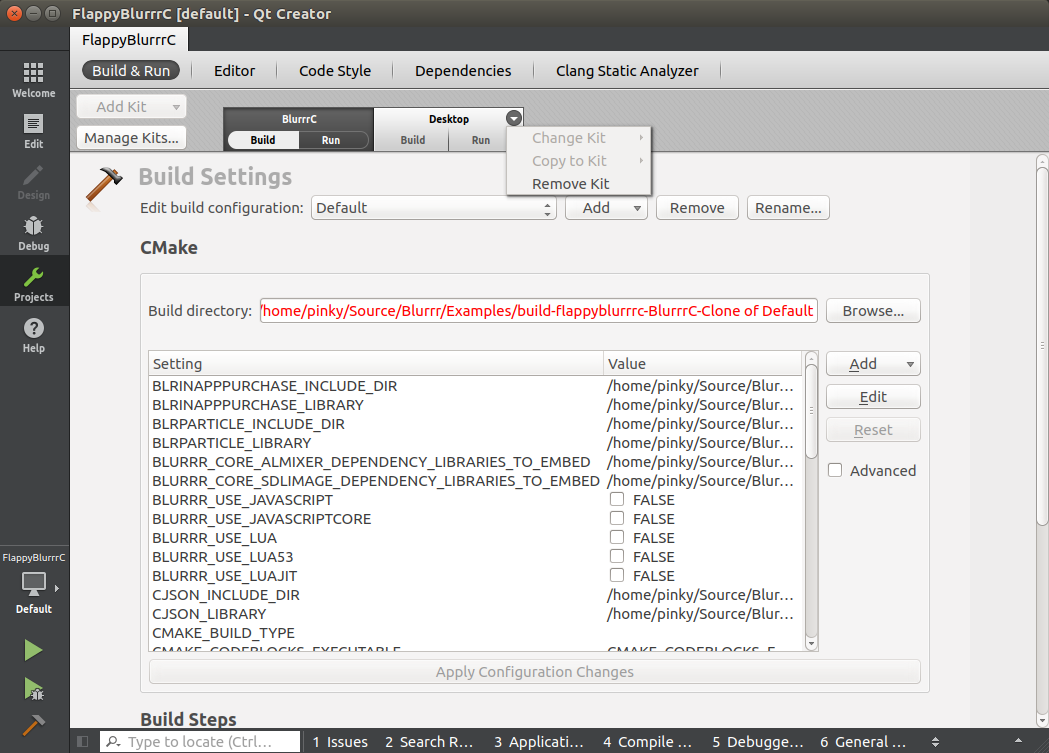
Now your project is ready to use. The buttons at the bottom-left tab bar are for running, debugging, and building respectively.  Refer to the official Qt Creator documentation for more information.
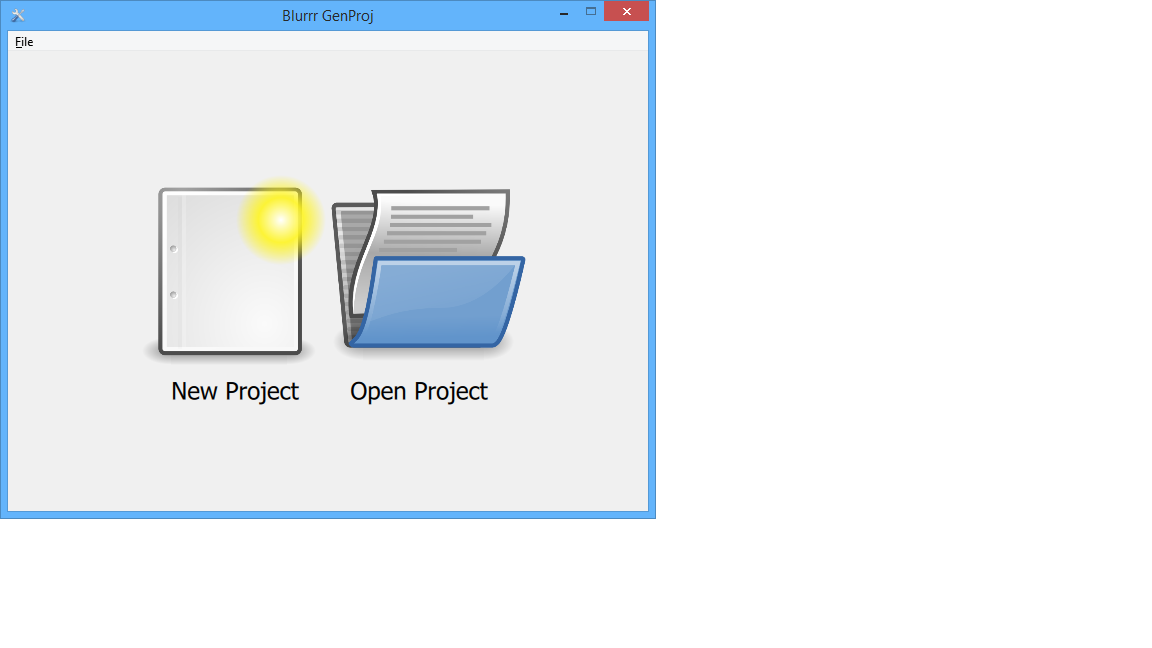
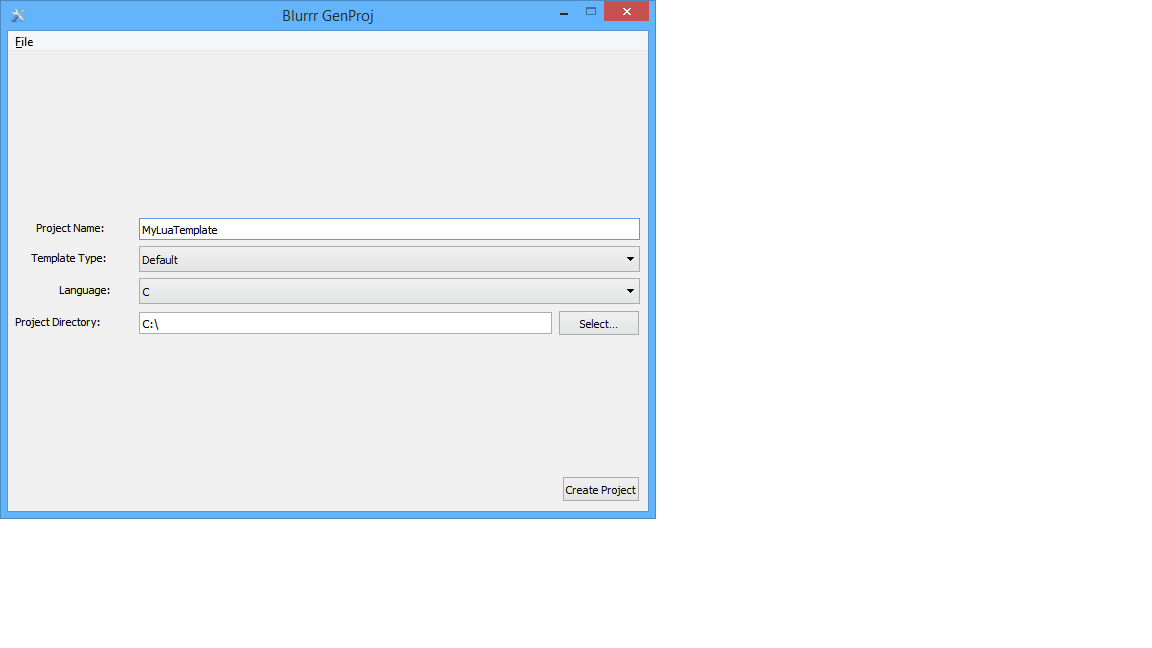
Select Windows with the version of Visual Studio installed on your computer as the Platform and click Generate. 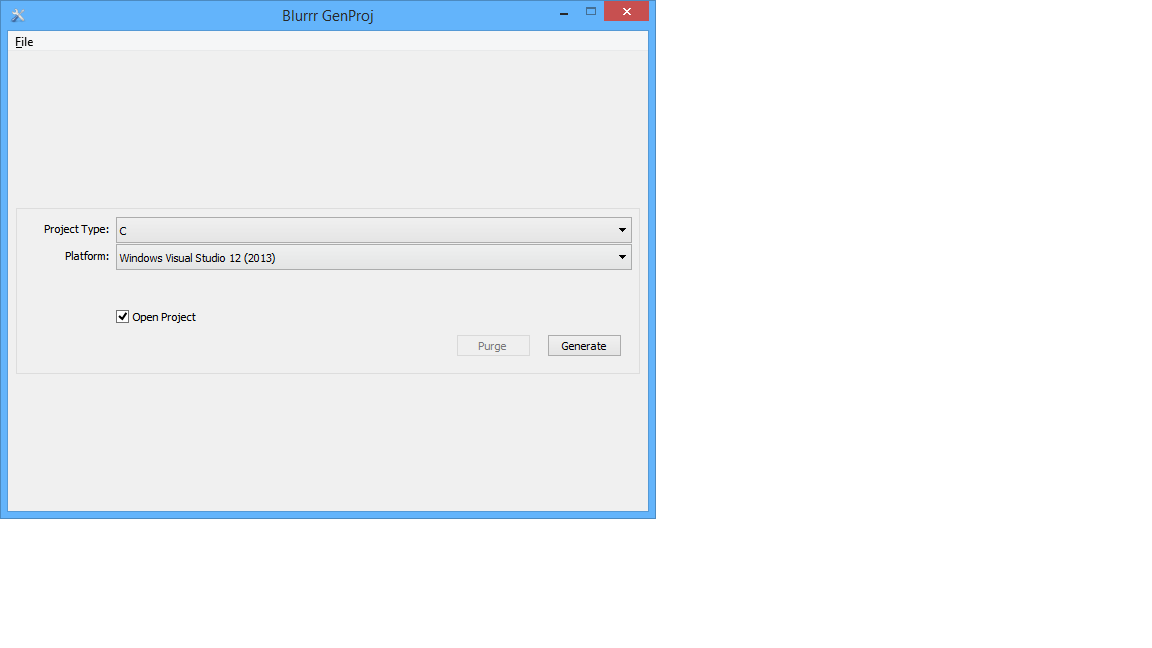
Visual Studio should automatically open in a few momments.
In Visual Studio in the left toolbar, right-click the MyBlurrrProject target and make it the Startup target. (Visual Studio likes to default to the ALL_BUILD target which is not as useful.) 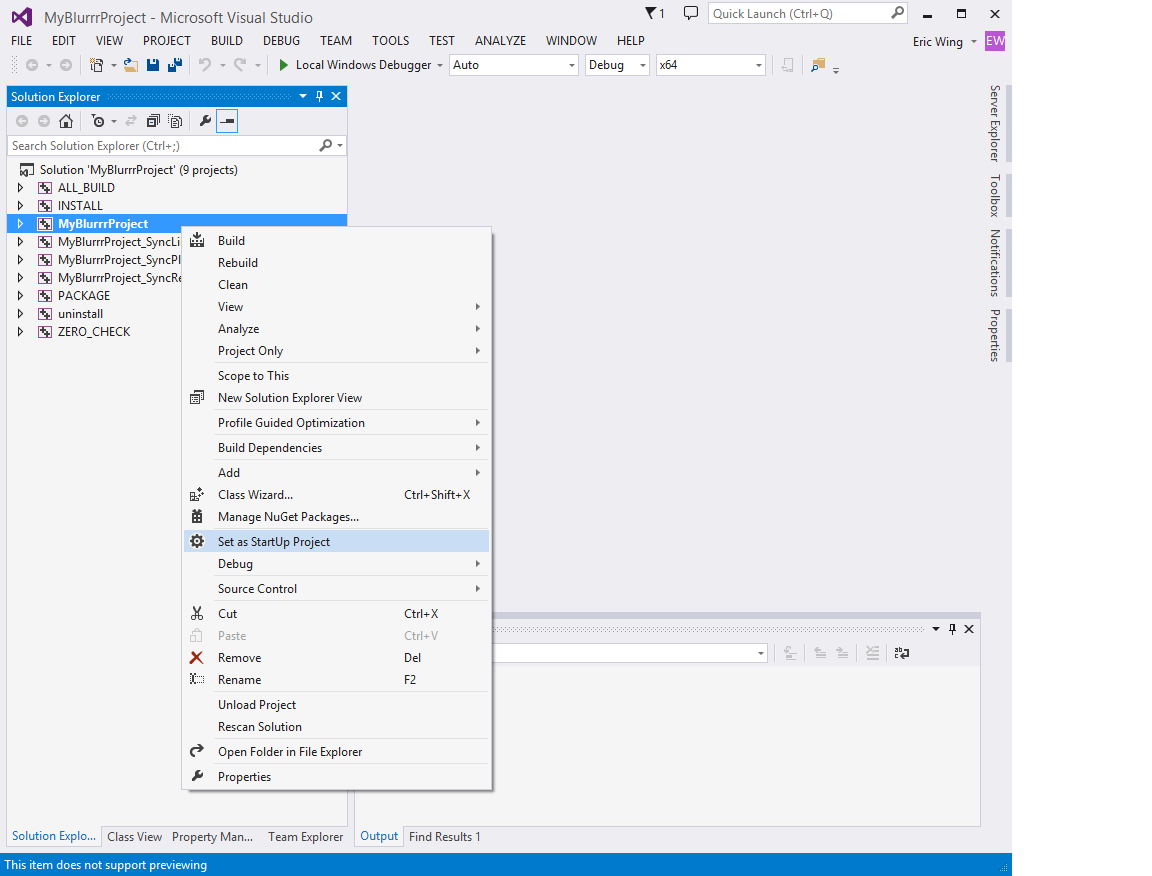
Hit the run button.
The application should build and run.
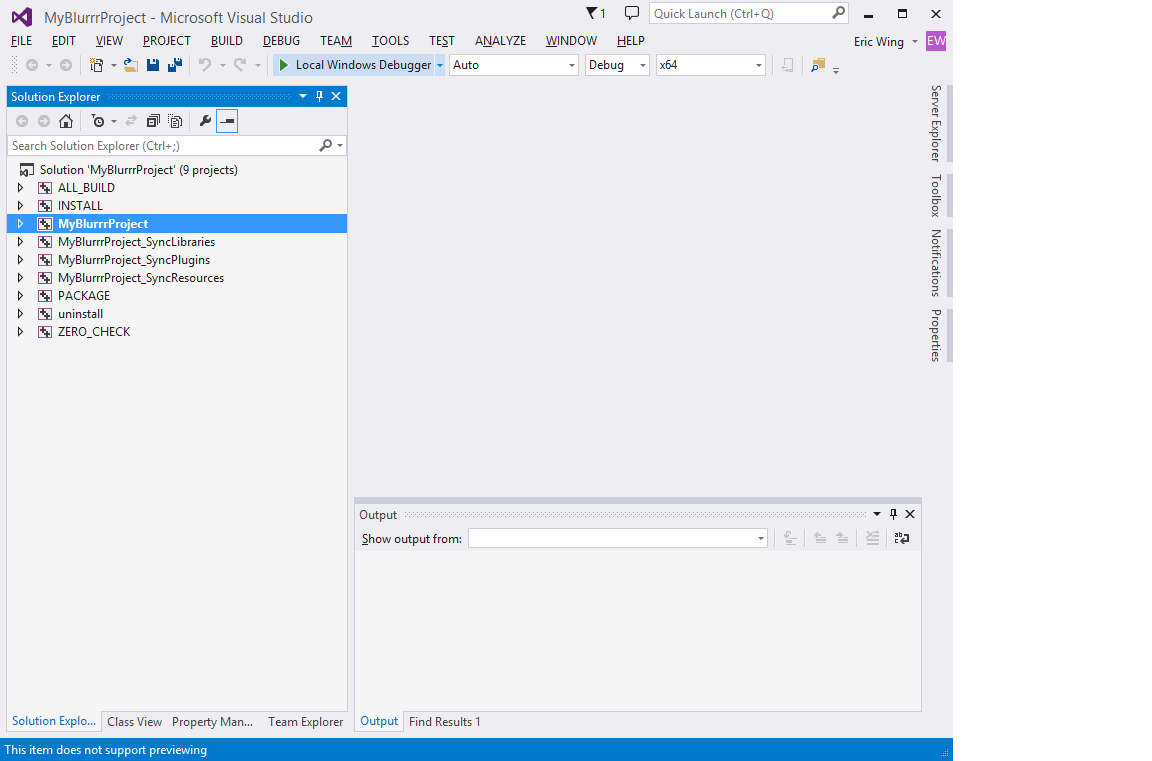
(Optional) Add the location of the Blurrr SDK to your environment path.
This will allow you to invoke the Blurrr SDK tools without typing in the absolute path all the time. You can do this in on a per CMD.EXE basis by typing the following every time.
set PATH=%PATH%;C:\BlurrrSDKOr you can set it in your Windows settings.
Go into the BlurrrSDK Templates folder and copy one of the templates directories (C, Lua, or JavaScriptCore) to some where on your computer. You may use Windows Explorer or use the command line (CMD.EXE), e.g.
xcopy /r /d /i /e /y C:\BlurrrSDK\Templates\Lua C:\MyLuaTemplateNow you have a new project containing all the source code and resources. But you don't have a build system yet.
Make a new empty directory some where else which will hold your build system.
As an example, make a directory called BUILD inside your copy of the template. (Optional) Then make a subdirectory called Windows. (This will allow us to keep all the different platforms separated, but under the same common BUILD directory.) You may use Explorer or the command line, e.g.
mkdir -p C:\MyLuaTemplate\BUILD\ WinVS2017Launch a command line terminal (CMD.EXE) (if you haven't already) and change directory to the BUILD/WinVS2017 directory.
cd C:\MyLuaTemplate\BUILD\WinVS2017There are multiple .bat scripts in the home directory of the Blurrr SDK. You want to run the one that suits the template you picked. The scripts are named with the scheme
genproj_<language>_<platform>.batThe script takes one parameter, which is the path to your template project.
Execute the following to generate a build system.
# Assumes you put Blurrr SDK in your PATH
genproj_lua_f64i64_windows.bat ..
Note: If you didn't put the Blurrr SDK in your path, you must specify the path to genproj.
# If you didn't put Blurrr SDK in your path,
# you must provide the full path
C:\BlurrrSDK\genproj_lua_f64i64_windows.bat ..
This will generate a Visual Studio project to build Windows binaries for a Lua based project.
Visual Studio should automatically open in a few momments.
In Visual Studio in the left toolbar, right-click the MyBlurrrProject target and make it the Startup target. (Visual Studio likes to default to the ALL_BUILD target which is not as useful.)
Hit the run button. The application should build and run.


Click Create Project
Select Andriod as the Platform and click Generate. 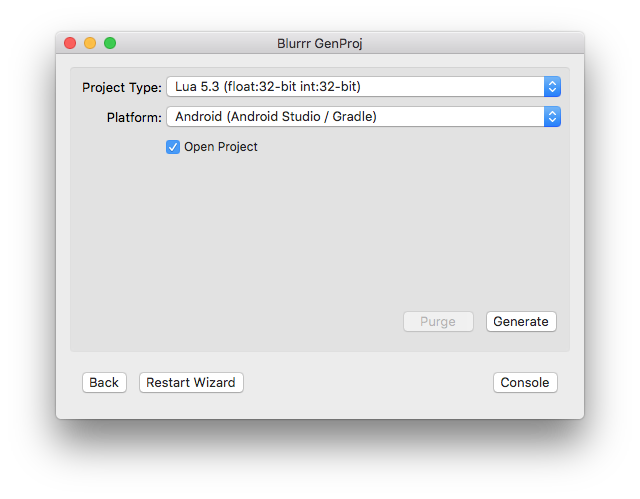
This will generate an Android Studio/gradle based build system to build Android binaries for a Lua based project. If "Open Project" is checked, Android Studio will launch and open the project.
Attach a development ready device to your computer via USB. (Make sure the device is enabled for development mode.)
To build and install to a connected device:
In Android Studio:
Click the Run button in the toolbar or go to the menu and select Run -> Run App.
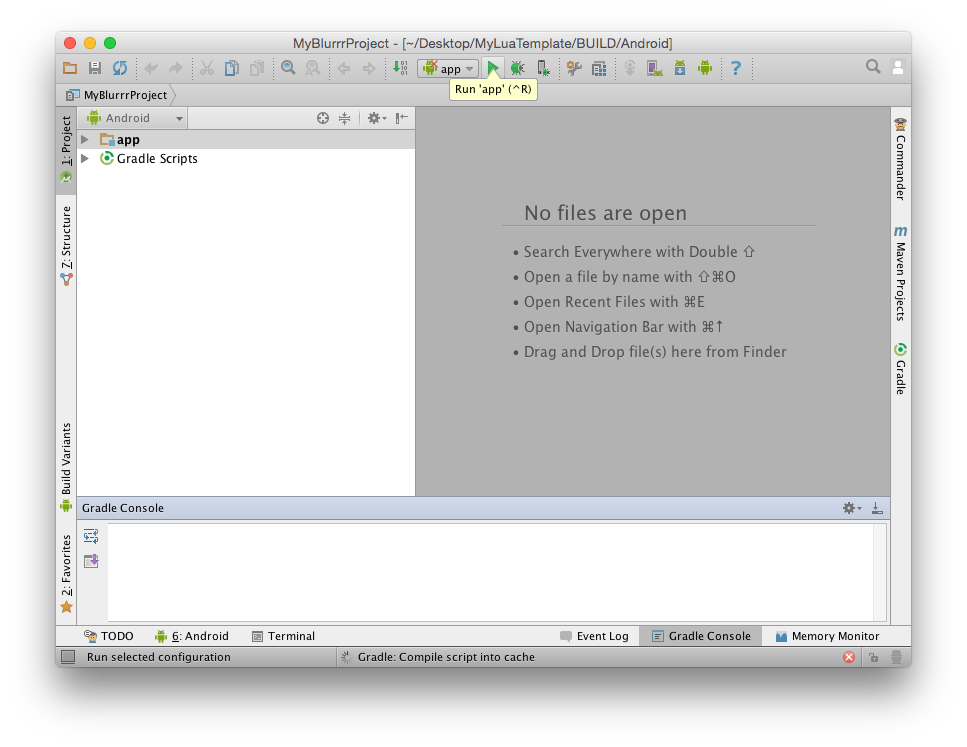
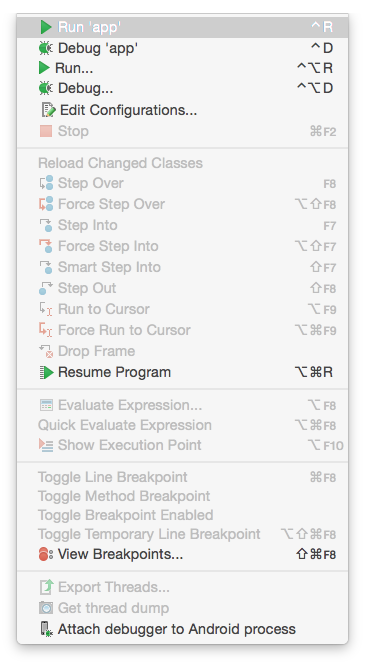
You will be prompted to select a device to run on. Select the device and it should install and launch.
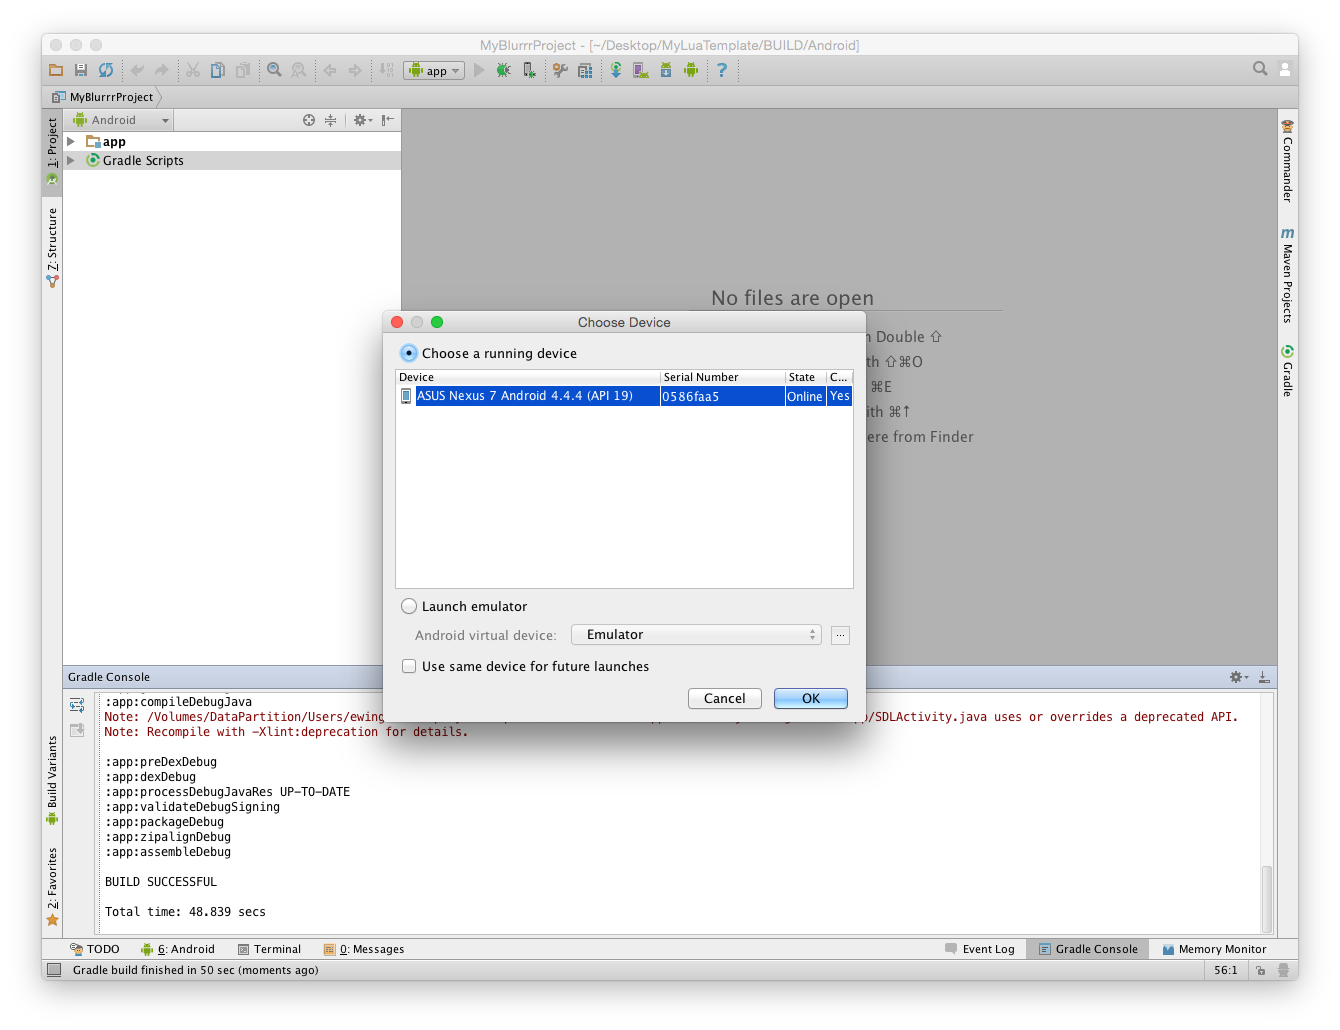
For command line:
# For macOS and Linux
./gradlew installDebug
# For Windows
gradlew installDebugTo see additional available commands:
./gradlew tasksand
./gradlew help(Optional) Add the location of the Blurrr SDK to your environment path.
This will allow you to invoke the Blurrr SDK tools without typing in the absolute path all the time.
# For macOS and Linux
export PATH=$PATH:~/BlurrrSDK
: For Windows
set PATH=%PATH%;C:\BlurrrSDKWindows users also must set the JAVA_HOME environmental variable to point to your installed JDK. Please refer to the official Java documentation for more information. (There is also a good chance this has already been set in your Windows settings. If so, you can skip this step.)
: For Windows, path will vary depending on your Java JDK installation:
set JAVA_HOME="C:\Program Files\Java\jdk1.8.0_40
For macOS and Linux, consider adding this to your .bashrc or appropriate shell configuration file. For Windows you can set it in your Windows settings.
Go into the BlurrrSDK Templates folder and copy one of the templates directories (C, Lua, or JavaScriptCore) to some where on your computer. You may use Windows Explorer or use the command line (CMD.EXE), e.g.
# For macOS and Linux
cp -R ~/BlurrrSDK/Templates/Lua ~/Desktop/MyLuaTemplate
: For Windows
xcopy /r /d /i /e /y %BLURRRSDK%/Templates/Lua C:\MyLuaTemplateNow you have a new project containing all the source code and resources. But you don't have a build system yet.
Make a new empty directory some where else which will hold your build system.
As an example, make a directory called BUILD inside your copy of the template. (Optional) Then make a subdirectory called Android. (This will allow us to keep all the different platforms separated, but under the same common BUILD directory.) You may use Finder/Explorer or the command line, e.g.
# For macOS and Linux
mkdir -p ~/MyLuaTemplate/BUILD/Android
: For Windows
mkdir -p C:\MyLuaTemplate\BUILD\AndroidLaunch a command line terminal (CMD.EXE) (if you haven't already) and change directory to the BUILD/Windows directory.
# For macOS and Linux
cd ~/MyLuaTemplate/BUILD/Android
: For Windows
cd C:\MyLuaTemplate\BUILD\AndroidThere are multiple .pl scripts in the home directory of the Blurrr SDK. You want to run the one that suits the template you picked. The scripts are named with the scheme
genproj_<language>_<platform>.plThe script takes one parameter, which is the path to your template project.
Execute the following to generate a build system.
# Assumes you put Blurrr SDK in your PATH
genproj_lua_f32i32_android.pl ../..
Note: If you did not put the Blurrr SDK in your path, you must specify the path to genproj.
# If you didn't put Blurrr SDK in your path,
# you must provide the full path
~/BlurrrSDK/genproj_lua_f32i32_android.pl ../..
Note: Blurrr SDK auto-detects the locations of the Android SDK and NDK by parsing information in your Android Studio preference files. If you have not run & configured Android Studio yet, or need to override the locations, you may use the additional command line switches:
genproj_lua_f32i32_android.pl --androidsdkroot /path/to/SDK --androidndkroot /path/to/NDK/ ../..This will generate an Android Studio/gradle based build system to build Android binaries for a Lua based project.
The Android Studio/gradle build system lets you use either command line (via gradlew) or IDE to build/run.
Attach a development ready device to your computer via USB. (Make sure the device is enabled for development mode.)
To build and install to a connected device:
For command line:
# For macOS and Linux
./gradlew installDebug
# For Windows
gradlew installDebugTo see additional available commands:
./gradlew tasksand
./gradlew helpFor Android Studio:
Find and select your build directory. The build directory will be under your project directory under BUILD/Android
Click the Run button in the toolbar or go to the menu and select Run -> Run App.


After the build, you will be prompted to select a device to run on. Select the device and it should install and launch.

CMake is the basis of Blurrr's build system. However, Blurrr's build system was designed to be user friendly in such a way that explicit CMake knowledge is not required for the typical program.
There are three files intended for you to edit/maintain:
CMakeBlurrrUserFiles.cmake
CMakeBlurrrProjectSettings.cmake
CMakeBlurrrDefaultOptionsOverride.cmake
When you add new scripts, source code, or resources, add them to CMakeBlurrrUserFiles.cmake. Think of this as your manifest for all files in your project.
To control things like Info.plist, AndroidManifest.xml, and general project settings, look at CMakeBlurrrProjectSettings.cmake.
For control over which Blurrr modules you want to use in your project, CMakeBlurrrDefaultOptionsOverride.cmake allows you to override the defaults.
Scaffolding is placed in these files to give you a starting point. The hash (#) character represents the beginning of a comment until the end of the line (like // in C/JavaScript and -- in Lua).
Our intention is that you can modify these files as needed for your project and we will try very hard not break these in future SDK updates.
Some projects may have special needs that require customization beyond what the provided build system can do. To accommodate this, the Blurrr SDK build system allows you to add your own local copies of CMake build script files to your project that override the default ones.
In the BlurrrSDK/bootstrap/SharedCMake/<language>/ directory, you will find the CMake files used to drive the build process for your project. Your Blurrr project was designed with a layout that mirrors this layout. (Notice the placement of CMakeModules in both locations.)
Your project's CMakeModules directory is mostly empty which means it reads from the SDK for all the scripts. But if you place a copy of a script from the SDK into the same relative location in your project, your copy will be used instead of the one in the SDK. This is effectively an override.
So for example, you need a bunch more things in your AndroidManifest that the default system does not provide. So copy the template AndroidManifest.xml.in from
bootstrap/SharedCMake/<language>/CMakeModules/AndroidGradle/app/src/main/AndroidManifest.xml.in
to
/your/project/CMakeModules/AndroidGradle/app/src/main/AndroidManifest.xml.in
Then modify your copy of the file.
Be aware that any files you override will miss any changes that get added to future SDK releases. You may want to compare the files you override to SDK updates and merge in changes as desired.
See the Introduction to Blurrr Videos on YouTube for alternative documentation.
macOS already builds a proper self-contained, drag-and-droppable .app bundle which is ready for distribution. Find it inside the BUILD/macOS/
You will probably want to do a Release or MinSizeRel or RelWithDebInfo build for final release.
Also, you may want to codesign your app and enable sandboxing (required for Mac App Store). While not required when distributing apps outside the App Store, codesigning with Developer ID will avoid Gatekeeper (on by default) from blocking your application from launching.
The BlurrrGenProj GUI provides an easy UI to select the codesigning type and key.
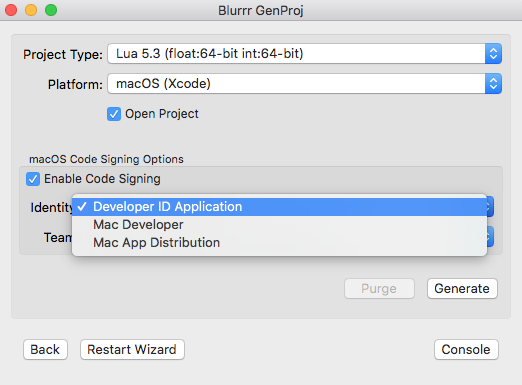
For generating through the command line tool, use the following flags filled in with the correct values:
-DBLURRR_OSX_CODESIGN_IDENTITY="Developer ID Application"
-DCMAKE_XCODE_ATTRIBUTE_DEVELOPMENT_TEAM="UZ12ABCY9Z"
-DCMAKE_XCODE_ATTRIBUTE_CODE_SIGN_STYLE=Manual
Alternatively, you may also enter values directly in your CMake files. In your project's CMakeBlurrrProjectSettings.cmake, search for the following block of code:
    set(BLURRR_OSX_CODESIGN_IDENTITY "")
    # set(BLURRR_OSX_CODESIGN_IDENTITY "Developer ID Application")
    # set(BLURRR_OSX_CODESIGN_IDENTITY "Mac Developer")
    # set(BLURRR_OSX_CODESIGN_IDENTITY "Mac App Distribution")
The first line sets the codesigning key to empty string, which means codesigning is disabled. To enable codesigning, comment out the first line, and uncomment out one of the following 3 lines depending on the type of deployment you want to use.
Tip: Directly putting these values in CMakeBlurrrProjectSettings.cmake is not the recommended solution because keys are not always shared across multiple developers on a project.
iOS already builds a proper .app bundle. Find it inside the BUILD/iOS/
You will probably want to do a Release or MinSizeRel or RelWithDebInfo build for final release.
For simulator builds, no codesigining is required. However for device builds, you must codesign it correctly.
The BlurrrGenProj GUI provides an easy UI to select the codesigning type and key.
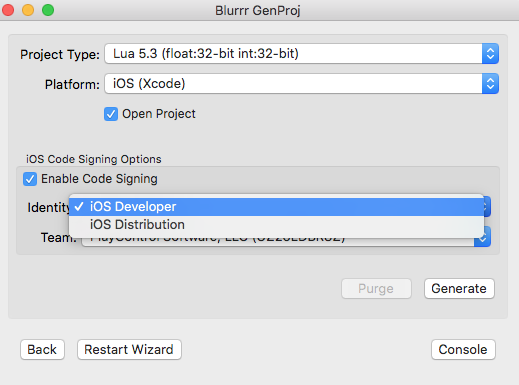
For generating through the command line tool, use the following flags filled in with the correct values:
-DBLURRR_OSX_CODESIGN_IDENTITY="iPhone Developer"
-DCMAKE_XCODE_ATTRIBUTE_DEVELOPMENT_TEAM="UZ12ABCY9Z"
Alternatively, you may also enter values directly in your CMake files. In your project's CMakeBlurrrProjectSettings.cmake, search for the following block of code:
    set(BLURRR_IOS_CODESIGN_IDENTITY "iPhone Developer")
    # set(BLURRR_IOS_CODESIGN_IDENTITY "iPhone Distribution")
Comment out one or the other depending on which you need at the moment. When you change these CMake settings, you should purge and regenerate.
Tip: Directly putting these values in CMakeBlurrrProjectSettings.cmake is not the recommended solution because keys are not always shared across multiple developers on a project.
For distribution, you should always build on Ubuntu 12.04 or under a properly configured Steam Runtime environment. Otherwise your application is not guaranteed to be compatible on all Linux desktops where Steam is available.
You will probably want to do a Release or MinSizeRel or RelWithDebInfo build for final release.
The generated Makefiles provide two additional targets
make installInstall will produce a completely self-contained copy of your final program (with all the dependencies) in a subdirectory of your BUILD/Linux directory called INSTALL. You can zip or tar this result up and distribute it to other computers.
Additionally, there is a second target:
make packagePackage will create several tar-balls including a self-extracting .sh variant in your BUILD/Linux directory. This will save you the step of needing to zip/tar the results from make install
For additional optional embellishment, as part of the distribution is a conveninece script called InstallDesktopEntry.sh. This script conforms to the FreeDesktop.org Desktop Entry Specification and will create desktop icons and menu entries for the user's desktop when run.
# To register your app
./InstallDesktopEntry.sh
# To unregister your app
./InstallDesktopEntry.sh --uninstallYou will probably want to do a Release or MinSizeRel or RelWithDebInfo build for final release.
In Visual Studio, you will see additional targets labeled INSTALL and PACKAGE. Right-click on those and select Build to run them.
INSTALL will produce a completely self-contained copy of your final program (with all the dependencies) in a subdirectory of your BUILD/Windows directory called INSTALL. You can zip this result up and distribute it to other computers. This is great for users who may not have Administrator access.
PACKAGE will produce an MSI installer. When you build this target, a typical Windows style installer will be creating in your BUILD/WinVS20* directory.
Find the built .apk's in
BUILD/Android/app/build/outputs/apk/
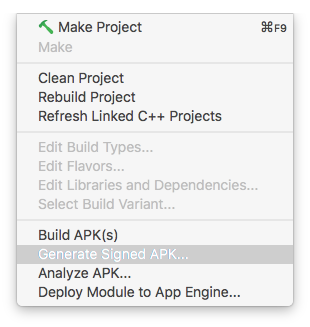
To codesign for distribution, use the built-in Android Studio codesigning mechanisms.
In the Android Studio menu, use: Build -> Generate Signed APK...
All Android apps have a Java component. For basic/default apps, you will not need to worry about this, but for advanced cases, you may need to modify the Activity class. You will find the default Activity at:
<Your Project>/CMakeModules/AndroidGradle/app/src/main/java/com/blurrrsdk/app/BlurrrActivity.java
The most common modification needed is to add or remove NDK libraries. Find the method, getLibraries(), and add or remove the appropriate string name for each library you want to change.
You currently need to re-generate (but you don't need to purge) the project for your changes to take effect.
For convenience, Blurrr attempts to make the common cross-platform files visible in the IDE. Due to Android design limitations, Android Studio cannot view files outside the Gradle directory. Blurrr uses symlinks to workaround this. However, on Windows, mklink requires Administrator permissions. Everything will still work without this, you just won't be able to see the shared files in the Android Studio IDE. If you want to see the files, consider changing the access permissions for mklink or using Mac or Linux for Android development.
The Android emulator is really slow. However there are two things you can do to make it more tolerable. - Install and enable the Intel x86 Emulator Accelerator (HAXM) and use the x86 Atom emulator - Enable "Use Host GPU" to get hardware graphics OpenGL ES acceleration
Blurrr supports x86 binaries (Swift excluded as of this writing) primarily for this use case since there are few real-world Android x86 devices.
Always keep in mind that emulation is not the same as a real device, so you always need to test on real devices.
Always keep in mind that the performance difference between mobile and desktop can be vast. Both CPU and GPU can contribute to large performance differences.
Also, operating system differences can sometimes create large differences, particularly things that are connected to I/O such as GPU drivers and file systems.
While all cross-platform libraries go to great length at abstracting differences away, the reality is that you will likely find subtle differences in behavior or performance, or possibly bugs. Thus it is to your advantage to catch these things early by testing frequently on all plaforms. You may even recognize design problems you didn't remember to anticipate such as touch screen controls not being easy to adapt to a control scheme you might have developed with a controller in mind.
You should always test on real devices. Tools like the iOS simulator, the Android Emulator, and virtualization tools like VirtualBox may behave drastically different than on real hardware. Things like rendering glitches to performance can be completely different.
Be very careful about case-sensitivty with file names. Mac and Windows use case-insensitive file systems (by default). iOS, Linux, and Android use case-sensitive file systems.
There are 2 different common gotchas:
Some techniques to avoid these problems:
While cross-platform development has obvious downsides, people often forget that it also provides some benefits. You now can leverage the best tools available on each platform. Typically, your program bugs are shared across all platforms, so you can pick from any of the platform tools available to solve it for all platforms.
For example:
OblivionGPU A SDL_gpu example demonstrating applying many GLSL shader effects. Based on the bundled Oblivion example (in Examples) which is a Chipmunk Physics demo featuring gravity, collisions, platforms, and buoyancy.
SimpleCurl: How to use libcurl to fetch a file for use in an SDL app.
Bork! Iup: An English to Swedish Chef translator app using native GUI via IUP, and with native platform calls to call each platform's native Speech Synthesizer APIs. The core code is a hybrid C+Lua app (C is main logic and LPeg for translation). Native platform code demonstrates Objective-C on Mac & iOS, Java on Android, C++ (and COM) on Windows, invoking a command line process on Linux. (Also includes JavaScript for Emscripten as a Skunkworks experiment.)
Removing assets from a project may leave stale copies in the build folders. You may want to manually delete these, or generate a new build folder/project from scratch (purge).
Android sometimes gets the following error when building:
:app:mergeDebugResources
Exception while processing task
java.lang.NullPointerException
at com.android.builder.png.QueuedCruncher$2.run(QueuedCruncher.java:157)
at com.android.builder.tasks.Job.runTask(Job.java:46)
at com.android.builder.png.QueuedCruncher$1.runTask(QueuedCruncher.java:108)
at com.android.builder.tasks.WorkQueue.run(WorkQueue.java:209)
at java.lang.Thread.run(Thread.java:745)
AAPT warning(Job{title=Cruncher abc_spinner_mtrl_am_alpha.9.png, latch=BooleanLatch{signaled=false}, result=false}): /Volumes/DataPartition/Users/ewing/Source/Blurrr/Templates/DIST/Templates/SDLgpu_JSC/BUILD/Android/app/build/intermediates/exploded-aar/com.android.support/appcompat-v7/22.0.0/res/drawable-hdpi-v4/abc_spinner_mtrl_am_alpha.9.png: libpng warning: iCCP: Not recognizing known sRGB profile that has been edited
Process list not empty
:app:mergeDebugResources FAILED
FAILURE: Build failed with an exception.
* What went wrong:
Execution failed for task ':app:mergeDebugResources'.
> Crunching Cruncher abc_ic_menu_selectall_mtrl_alpha.png failed, see logs
* Try:
Run with --stacktrace option to get the stack trace. Run with --info or --debug option to get more log output.
BUILD FAILEDThis is an Android gradle bug The workaround is to try building again because the failure only happens sometimes. Usually the build will just pass through with a warning instead of a crash.
Installing an Android/Swift project (or very large apk) is sometimes known to time-out and fail via gradle/Android Studio. Use adb install directly to workaround. ````
adb install /path/to/your.apk to install
or reinstall when the package is already on the device
adb install -r /path/to/your.apk to install
````
All templates and example code are still in flux.
SDL_gpu load image has a memory allocator bug. Please use SDL_image and pass SDL_surface to SDL_gpu
SDL_gpu is not yet 1.0 so there may be API changes in the future.
Lua and JavaScript bindings status:
Zerobrane Studio plugin for Blurrr seems to be working for desktop. More testing on mobile is needed.
Much more documentation and videos to come.
You need to install:
Android Studio
You also need to install the following options in Android Studio settings:
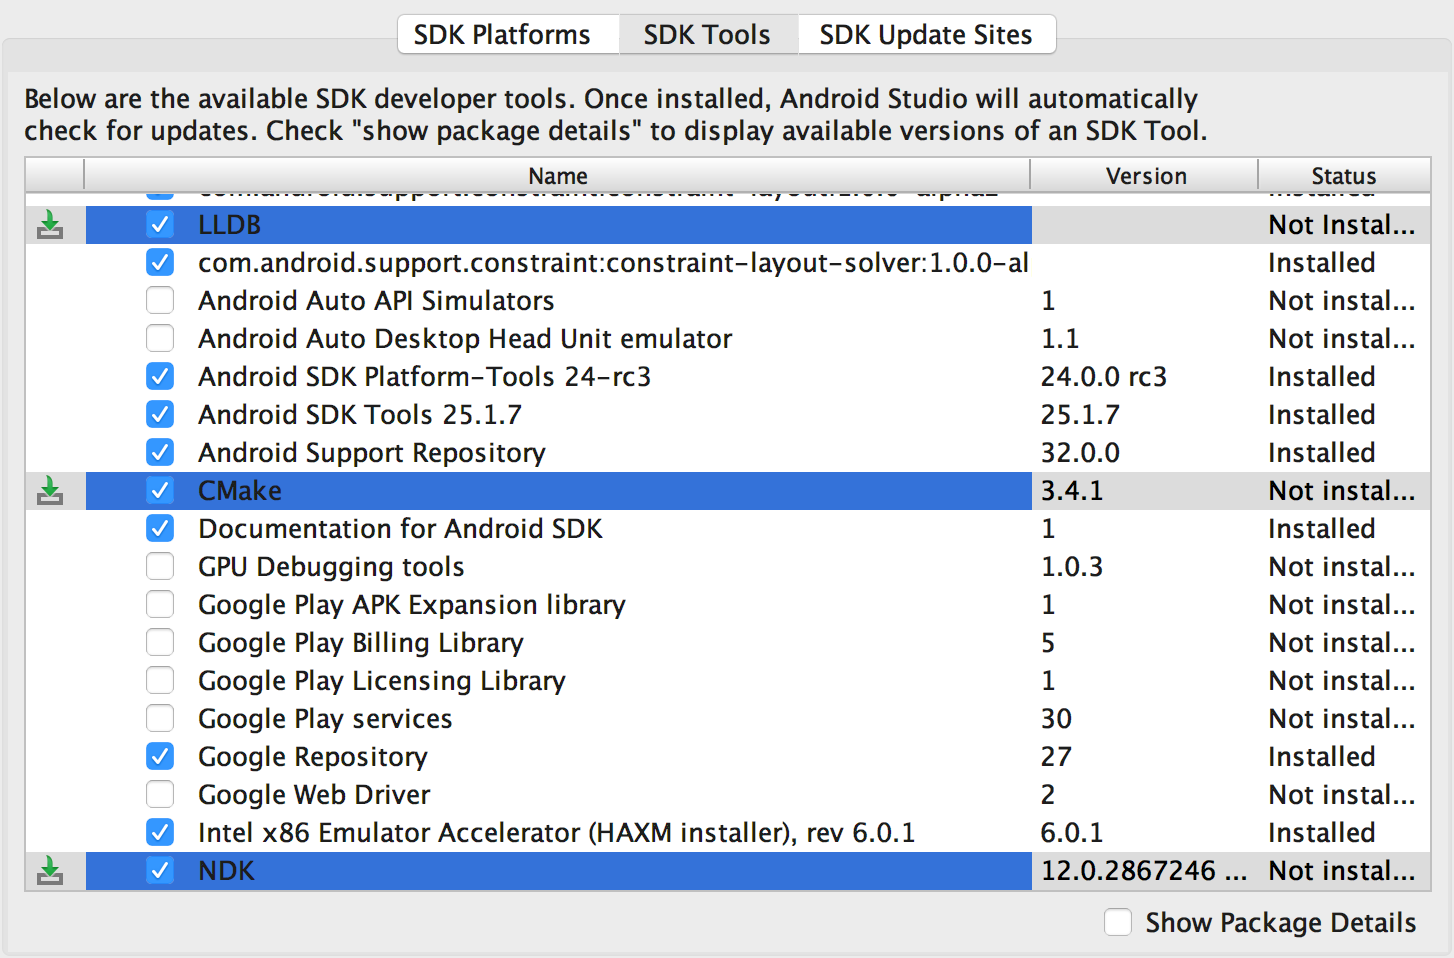
NOTE: Android NDK API levels are intentionally picked for best compatibility. Be careful about changing these because
Google has been known to break ABI compatibility with Bionic (libc).
Note: Some Android tools are 32-bit only and will fail to run on 64-bit Linux. How to deal with this will vary with distro and version. For Ubuntu, install these components:
The above thread says you should install the following:
sudo apt-get install libc6-i386 lib32stdc++6 lib32gcc1 lib32ncurses5 lib32z1However, you may be able to reduce that to the following:
sudo apt-get install lib32stdc++6 lib32z1Note: Android development on Windows is not as well supported by Google and lacks a lot of documentation about Windows specific issues. Consider doing your Android development on Mac or Linux for an improved experience and less headaches.
In all cases, please refer to the Android official documentation for the most up-to-date information on how to install their development environment.
Note: The very first time you run gradlew/Android Studio, it may try to update itself by downloading more components from the Internet. This may take a few minutes. Don't worry, this is an infrequent event.
Note: Blurrr SDK's auto-find-location for Android Studio, SDK, and NDK work by parsing Android Studio's preference files. You must launch Android Studio once (and setup everything) and quit before these preference files are completely written to disk. So for the best experience, you should have launched and quit Android Studio at least once before using Blurrr SDK.
Tip: Android Studio/Gradle is pretty slow. (Again, send hate mail to Google, not us.) Consider the following article to help improve start up times dramatically.